
Locally
Locally resolved testing of mechanical properties.
Automated
Fully automated characterization of strength fields.
Fast & Easy
Results within 45 seconds.
Multi Sample
Check multiple samples with, for example, more than 200 measurement points.
Insight into Applications
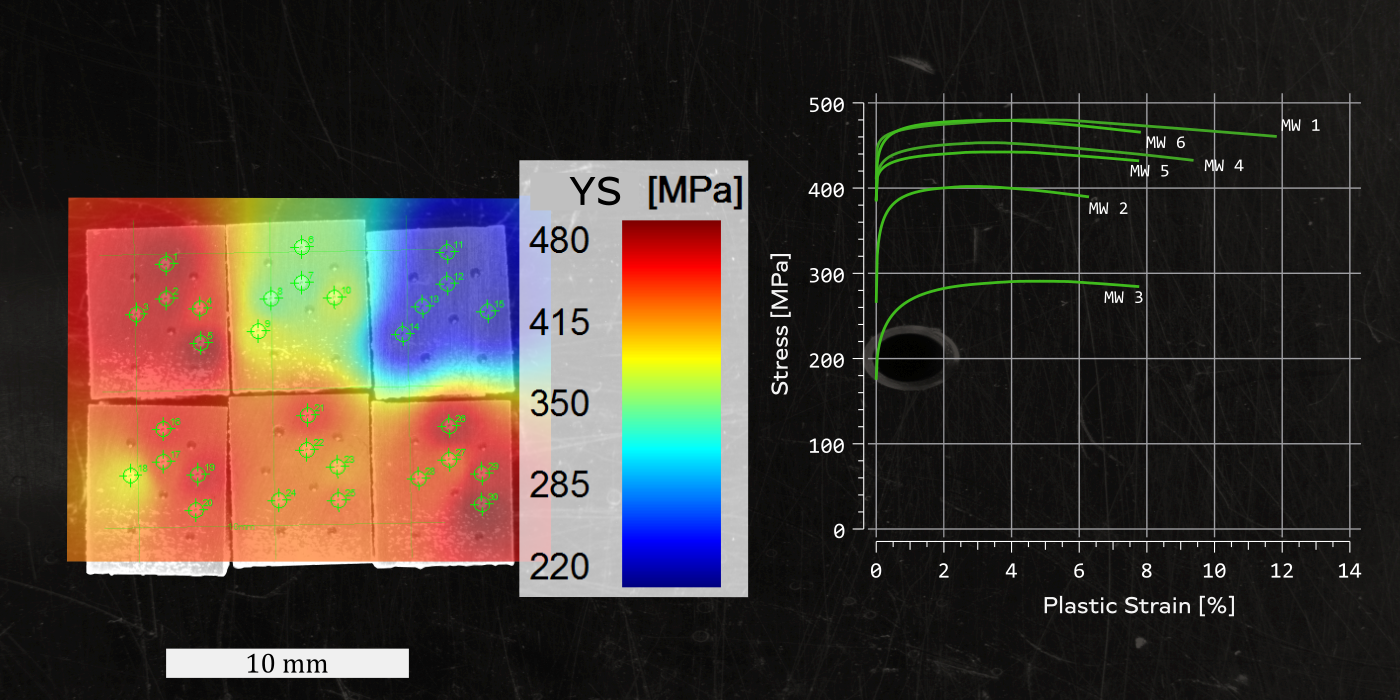
Application #1: Multisample screening for the development of alloys with fast available data.
In the early stages of alloy development, quickly accessible data, including mechanical properties, is often very helpful. It accelerates the process of development through close iteration loops, where steps between adjusting parameters and getting data are accelerated exponentially. Within approx. 30 minutes, 30 plastic flow curves were measured.

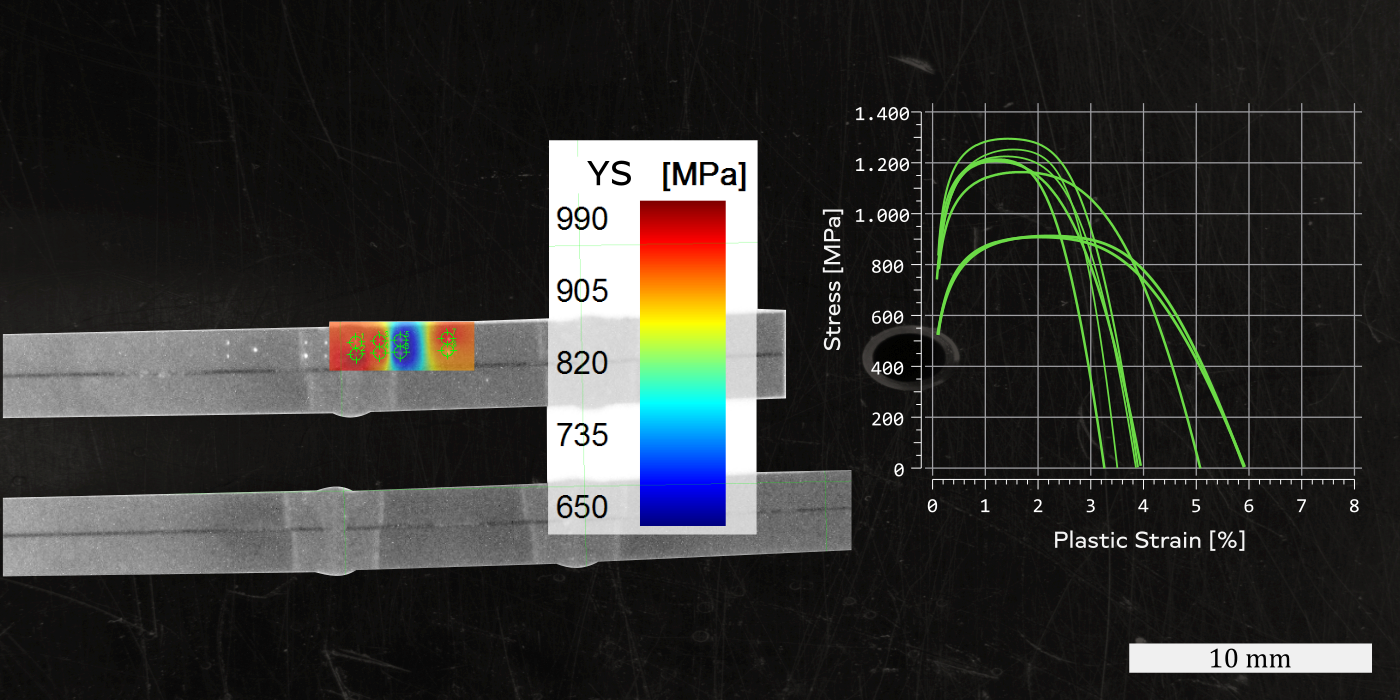
Application #2: Weld seam examination. Testing of tensile strength, yield strength and ductility.
In the context of research work, weld joints were characterized for their mechanical properties in the base material, transition zone, heat-affected zone, and weld seam. Traditionally, the Vickers hardness test was used to measure local hardnesses with measurement points arranged in lines along the weld joint.

Details on the procedure
Determined values: comparative tensile strength RIm, comparative yield strength RIp0,2, hardening n, ductility D
Standard: DIN SPEC 4864 was the very first standard of its kind developed in collaboration with the Federal Institute for Materials Testing, the Materials Testing Office MPA-NRW, the "Physikalisch Technische Bundesanstalt" and industry partners (published by Beuth Verlag in Germany in November 2019).
Procedure: the Imprint Test is based on indentations and high-precision 3D measurements, using a white light interferometer, and finite element simulations to determine a plastic stress strain curve out of the indentation (pile-up profile). The indent, characterized by plastic deformation above the surface known as pile-up, reflects the unique mechanical properties of the tested material. Real measured data according to the geometry of the plastic deformation is brought into precise agreement with simulated data, and material properties such as yield strength and tensile strength from indentation are available.
Development: the test procedure was initially invented at the RUB (Ruhr-Universität Bochum) and developed by the team of Imprintec GmbH. Measurements can now be fully automated and completed in less than a minute, whether in laboratories, inline, or using mobile devices.
Applications: it enables the fast and cost-effective determination of mechanical properties. Furthermore, the indentation enables testing of components, thin/small parts, strength gradients and high-throughput testing. This makes a significant contribution to the development and optimization of components and processes. It is particularly impactful in sectors such as aerospace, automotive, civil engineering, oil & gas, construction, medical devices, mechanical engineering, and the energy sector.Comparison to classic materials testing methods
Comparison to "conversion of hardness to tensile strength":
- the indentation method determines the tensile strength of various metals (aluminum, high-alloy steels, titanium, copper, magnesium, nickel) which are not specified in DIN EN ISO 18625 "Revaluation of hardness values".
- determination of yield strength
- comparable effort in testing and sample preparation between hardness conversion and the indentation method
Compared to the tensile test:
- less effort in sample preparation, because there is no need for a tensile test sample
- fast testing (approx. between 30 and 90 seconds) and low-destructive testing
- comparable results (tensile strength, yield strength)
- determination of mechanical properties for small samples or components
- characterization of gradients through tensile strength and yield strength (e.g. welded joints, heat-affected zones, strain hardening, etc.)
Beuth - publishing DIN: materials [German language]
"Test method for the determination of flow curves and benchmark characteristic values for tensile testing by means of minor destructive indentation, 3D measurement and finite-element material models"Order measurements:

#7 Material Testing
Indentation Plastometry Imprint Test
The indentation plastometry based imprint test according to DIN SPEC 4864 enables the precise determination of yield strength, tensile strength, and ductility from indentation tests and serves as an effective alternative to tensile testing. It is used for small parts, welds, and cold working, providing valuable data for finite element analysis (FEM).